


If you are running a business in the custom apparel industry, you already know that a DTG printer (Direct-to-Garment) is a massive investment. These machines are the beating heart of modern print on demand businesses, allowing creators to print high-resolution, full-color designs directly onto t-shirts, hoodies, and tote bags with incredible precision. However, unlike traditional screen printing presses or standard office paper printers, DTG machines require a very specific, disciplined approach to upkeep. The Amazing fact about dtg printer.
Proper DTG printer maintenance and care is not just a recommendation; it is an absolute necessity. Without it, you risk facing disastrous downtime, ruined garments, and thousands of dollars in replacement parts. The complex internal plumbing, sensitive printheads, and heavy, pigment-based textile inks all demand consistent attention.
In this comprehensive guide, we will walk you through every aspect of keeping your machine running at peak performance. From understanding the nuances of white ink to establishing foolproof daily routines and troubleshooting common print defects, this ultimate guide covers everything you need to know to protect your investment and keep your production lines moving perfectly.
1. The Environment: The Foundation of DTG Health
Before you even touch a cleaning swab or run a maintenance cycle, you must address the environment in which your printer lives. Environmental factors are the silent killers of DTG equipment. The specialized water-based textile inks used in these machines are highly sensitive to temperature, dust, and, most importantly, moisture in the air.
Maintaining Optimal Humidity for DTG Printing
One of the most critical factors for successful printing is maintaining optimal humidity for dtg printing. Water-based inks dry quickly when exposed to air. If your print shop is too dry, the ink will begin to dry on the printhead nozzles, on the wiper blades, and inside the capping station.
- The Sweet Spot: The ideal relative humidity (RH) for a DTG environment is usually between 45% and 60% (non-condensing).
- Tools You Need: Invest in multiple digital hygrometers and place them around your print room. Do not rely on a single reading, as microclimates can form in corners or near air conditioning vents.
- Humidification Strategy: If you live in a dry climate or run heaters during winter, you must use an industrial-grade humidifier. Ultrasonic or evaporative humidifiers placed near (but not directly spraying on) the printer will keep the air moist enough to prevent ink from prematurely curing inside the microscopic nozzles.
Temperature Control
Alongside humidity, temperature plays a vital role in ink viscosity. Most manufacturers recommend operating temperatures between 60°F and 85°F (15°C to 29°C).
- If the room is too cold, the ink becomes thick and sluggish, leading to flow issues and ink starvation during high-speed printing.
- If the room is too hot, the ink can thin out, causing pooling on the garment, or it can evaporate too quickly, leading to clogs.
Dust and Lint Management
A custom apparel shop is naturally filled with lint from cotton shirts and hoodies. Lint is the enemy of the printhead. If lint accumulates on the encoder strip or gets dragged across the printhead by the wiper blade, it can cause devastating clogs and sensor errors. Use an air purifier, vacuum the shop floor daily (avoid sweeping, which kicks up dust), and shake out garments away from the printer before loading them onto the platen.
2. Establishing Your Routine: Daily vs Weekly DTG Maintenance Schedule
Consistency is the secret to prolonging dtg printhead lifespan and ensuring brilliant, sellable prints every single time. Having a documented daily vs weekly dtg maintenance schedule eliminates guesswork and holds you (or your employees) accountable.
The Daily Maintenance Routine
Your daily routine should take no more than 10 to 15 minutes, but skipping it can cost you hours of troubleshooting later.
- Agitate the Inks: (Specifically the white ink—more on this later). Gently shake the ink cartridges or bulk tanks to ensure the pigments are suspended.
- Check Environmental Levels: Log the temperature and humidity. Adjust humidifiers or AC units as needed.
- Run a Nozzle Check: Before printing on any customer garments, always print a nozzle check pattern onto a piece of clear film or scrap fabric. This shows you exactly how many nozzles are firing correctly.
- Perform Light Cleaning (If Needed): If the nozzle check is less than 100% perfect, run a standard printhead cleaning cycle.
- End of Day Wiper and Capping Station Wipe-Down: At the end of your shift, use a lint-free foam swab dipped in manufacturer-approved cleaning solution to clean the edges of the capping station and the wiper blade.
- Leave the Machine Powered On (Usually): Most modern machines require you to leave the main power switch at the back “on” while hitting the sleep/standby button on the front. This allows the machine to run background maintenance.

The Weekly Maintenance Routine
Set aside 30 to 45 minutes once a week (e.g., Friday afternoon or Monday morning) for a deeper clean.
- Clean the Encoder Strip: Carefully wipe down the optical sensor strip to prevent misalignments.
- Clean the Printhead Circumference: Using a foam swab and cleaning fluid, gently clean around the edges of the printhead. (Never touch the bottom nozzle plate directly!).
- Flushing the Capping Station: Pour a small amount of cleaning solution into the capping station to dissolve any coagulated ink in the pump lines.
- Inspect Dampeners and Lines: Look for air bubbles in the ink lines or signs of ink settling.
- Pretreatment Machine Deep Clean: Clean your pretreat machine’s filters and nozzles to ensure even spray coverage.
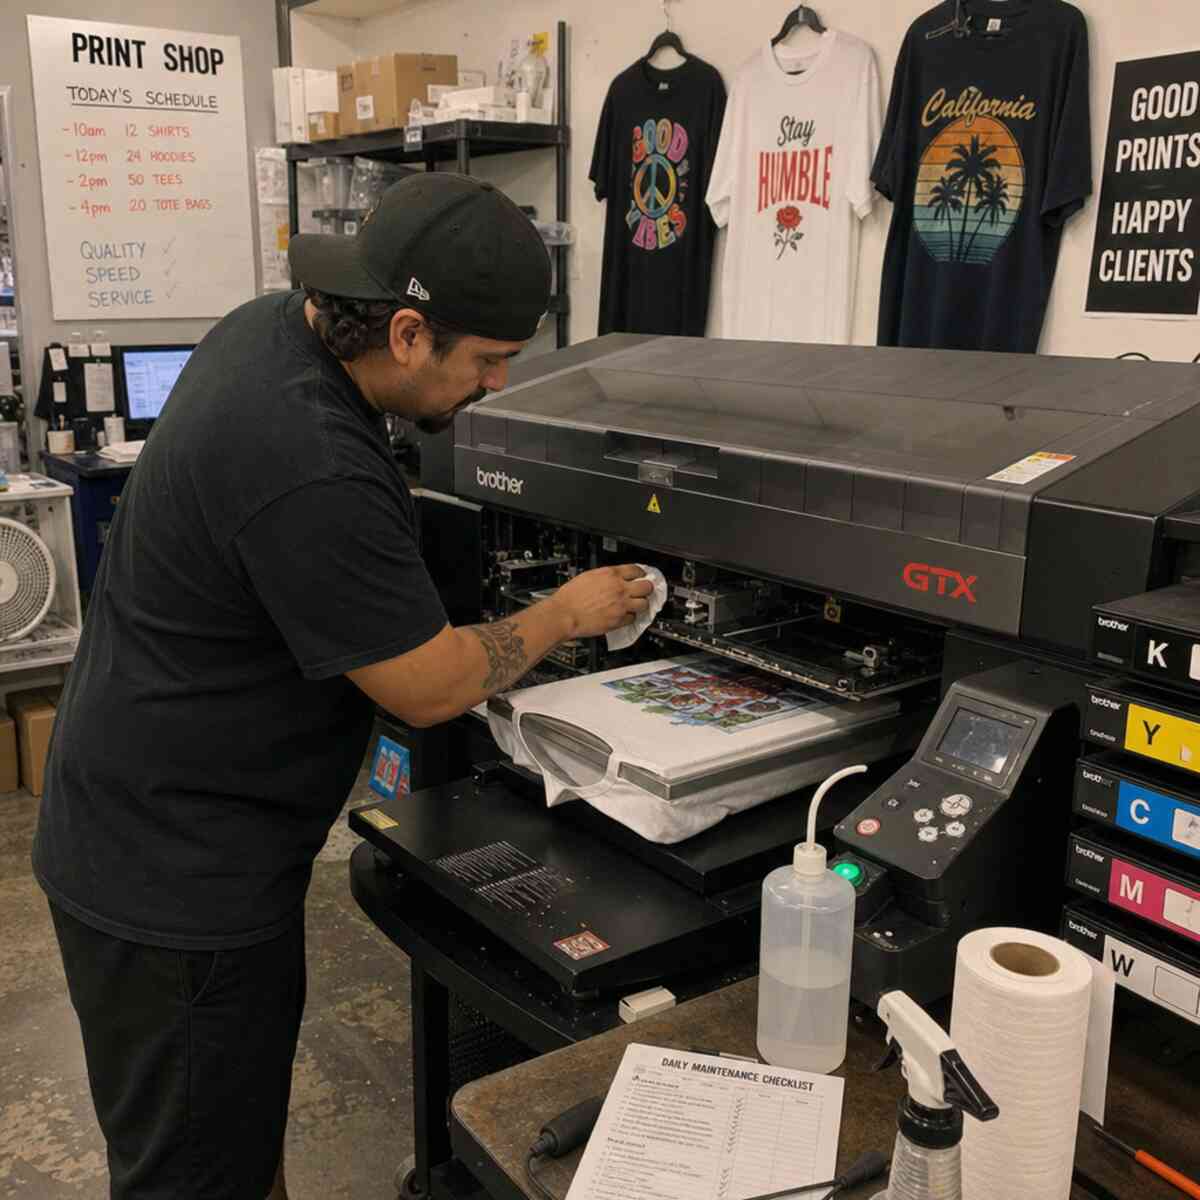
3. Deep Dive: Protecting and Cleaning the Printhead
The printhead is the most expensive and delicate component of your DTG printer. It features thousands of microscopic nozzles that fire ink droplets measured in picoliters. Knowing exactly how often to clean dtg print head components will save you from premature replacements.
Automatic Cleaning Cycles Benefits
Modern DTG machines are equipped with smart firmware that automatically runs periodic cleaning cycles, especially when the machine is idle. The automatic cleaning cycles benefits are tremendous:
- They keep ink flowing through the dampers and nozzles.
- They prevent the surface of the printhead from drying out.
- They maintain pressure in the ink delivery system.
However, you should not rely on automatic cycles alone. While they do an excellent job of flushing minor clogs, they cannot physically remove lint, dust, or dried ink crust that builds up mechanically on the edges of the printhead or the wiper blade.
How Often to Clean DTG Print Head (Manual Cleaning)
You should manually clean around the printhead at least once a week. If you are running high-volume production (e.g., printing 100+ shirts a day), you may need to perform a physical wipe-down every two to three days.
Important Rule: Never use cotton swabs (Q-tips). The cotton fibers will get trapped in the nozzles and destroy the printhead. Only use dense, lint-free foam swabs designed for printer maintenance.
Fixing Clogged DTG Nozzles
Even with perfect maintenance, you will eventually experience a clogged nozzle. This usually manifests as missing lines in your nozzle check or noticeable striping in your prints. Here is the escalation process for fixing clogged dtg nozzles:
- Standard Head Cleaning: Run a normal head cleaning cycle from your printer’s control panel. Do this up to two times. Print a nozzle check after each to see if the clog has cleared.
- Powerful/Heavy Head Cleaning: If the standard clean fails, run a heavy clean. Warning: Heavy cleans consume a massive amount of ink. Do not run more than two heavy cleans in a row. If it doesn’t clear, you are just wasting money and potentially introducing air into the lines.
- The “Waterfall” Method (For Advanced Users): If a nozzle is stubbornly clogged, some technicians recommend a gentle manual flush using a syringe and cleaning solution to push fluid through the printhead. This creates a “waterfall” effect out of the nozzles. Note: Doing this improperly can blow the internal seals of the printhead, permanently destroying it. Only attempt this if you are out of warranty and comfortable with advanced hardware repairs.
- Wet Capping (Soaking): The safest method for a stubborn clog is to utilize wet capping (discussed in detail later) to let the dried ink soften overnight.
4. The White Ink Challenge: Chemistry and Maintenance
If you ask any print on demand shop owner what their biggest headache is, the answer is always the same: White Ink.
White DTG ink is heavily pigmented with titanium dioxide, a heavy, chalky mineral that gives the ink its brilliant opacity on dark garments. Because titanium dioxide is so heavy, it constantly wants to sink to the bottom of the cartridge, the ink lines, and the printhead. If left sitting, the ink separates, with the heavy solids turning into a thick, sludge-like paste that will instantly clog your entire system.
Preventing Ink Sedimentation in Lines
The key to managing white ink is constant motion. Preventing ink sedimentation in lines requires both mechanical agitation and consistent printing.
- Daily Shaking: Every morning, remove your white ink cartridges and invert them gently back and forth for about 60 seconds. Do not shake them violently, as this creates micro-bubbles that will cause ink starvation during printing.
- Print Regularly: The best way to keep ink from settling in the lines is to print. If you have a slow day with no dark-garment orders, print a large white block on a scrap shirt just to move the ink through the system.
White Ink Circulation System Cleaning
To combat sedimentation, most professional-grade machines feature WIMS (White Ink Management Systems). These systems use a small peristaltic pump to constantly circulate the white ink from the tank, through the lines, to the dampeners, and back again.
However, white ink circulation system cleaning is still required. Over time, the circulation tubes can build up a chalky residue on the inner walls, restricting flow.
- Quarterly Tube Maintenance: Depending on your manufacturer, you may need to flush the white ink circulation lines with specialized cleaning fluid every 3 to 6 months. This dissolves the titanium dioxide buildup.
- Check the Pump: Ensure the WIMS pump is actually turning. Sometimes the gears strip or the motor burns out, and you won’t realize the ink has stopped circulating until your printhead is completely clogged.
5. Station and Wiper Upkeep: The Capping Station
The capping station (or maintenance station) is where the printhead docks when it is not actively printing. It serves two vital functions: it creates an airtight seal around the printhead to prevent the ink from drying, and it houses the vacuum pump that pulls ink through the printhead during cleaning cycles. If your capping station is dirty, your printhead is in danger.
Steps for Cleaning DTG Capping Station
To maintain that critical airtight seal, you must keep the rubber edges (the lip) of the capping station perfectly clean.
Here are the precise steps for cleaning dtg capping station:
- Unlock the Printhead: Use your printer’s menu to release the printhead carriage and move it out of the way to expose the capping station.
- Prepare Your Tools: Put on nitrile gloves and grab a clean, lint-free foam swab and your DTG cleaning fluid.
- Swab the Rubber Lip: Dip the swab into the fluid and gently run it along the outer rubber seal of the cap. You will see thick, gummy ink come off. Use multiple swabs if necessary until the rubber is completely clean and soft.
- Clean the Wiper Blade: Next to the cap is the wiper blade (a small rubber squeegee that wipes the bottom of the printhead). Clean both sides of this blade thoroughly. A dirty wiper blade will smear dried ink directly into your clean nozzles!
- Flush the Cap Sponge: Pour a few drops (do not overflow it) of cleaning fluid directly onto the sponge inside the capping station. This keeps the sponge moist and helps dissolve ink in the waste tubes below.
Wet Capping vs Dry Capping Methods
When dealing with severe clogs or preparing a machine to sit idle for a few days, you need to understand wet capping vs dry capping methods.
- Dry Capping (Standard): This is just normal operation. The printhead docks on the capping station, relying on the rubber seal to keep ambient air out. It’s sufficient for daily use if your humidity is correct.
- Wet Capping (Restorative): Wet capping involves intentionally flooding the capping station sponge with cleaning fluid just before docking the printhead. By doing this, the printhead sits in a highly humid micro-environment of cleaning solvent. The solvent vapors soften hard, dried ink overnight. If you have a stubborn clog, wet capping on a Friday evening and leaving it until Monday morning will often work miracles and save you from having to replace the head.
6. Internal Mechanics: Encoders, Filters, and Dampers
While ink delivery gets the most attention, the electromechanical components of your printer require just as much care.
Encoder Strip Cleaning Instructions
The encoder strip is a thin, translucent strip of plastic running the length of the printer carriage path. It has microscopic vertical lines printed on it. The printhead carriage uses an optical sensor to read these lines, telling the printer exactly where the carriage is on the X-axis.
If a drop of ink, a speck of grease, or garment lint gets on this strip, the sensor gets “blinded.” When the printer loses its place, it will fire ink in the wrong location, resulting in a blurred image, a sudden jagged shift in the print, or an immediate fatal error code.
Encoder strip cleaning instructions:
- Turn the printer off and unplug it to avoid electrical shorts.
- Use a lint-free cloth or a specialized cleaning wipe (never use paper towels, which can scratch the plastic).
- Moisten the cloth lightly with distilled water or isopropyl alcohol (check your manufacturer manual—some plastics react poorly to alcohol).
- Pinch the strip gently with the damp cloth and wipe from one end to the other in a single, smooth motion.
- Caution: Be incredibly gentle. The strip is held on by fragile metal springs. If you pull too hard and unhook or snap the spring, the printer is down until a technician can replace it.
Replacing DTG Ink Dampeners and Filters
Ink dampeners act as the final gateway before ink enters the printhead. They serve a dual purpose: they filter out any micro-coagulations of ink, and they regulate the fluid pressure so the printhead doesn’t get flooded or starved.
Over time, the fine mesh filters inside the dampeners get permanently clogged with titanium dioxide (from white ink) and normal pigment particles. When a dampener fails, you will experience sudden ink starvation—your nozzle check will be perfect, but halfway through printing a large design, the color will drop out completely.
Replacing dtg ink dampeners and filters is a standard consumable maintenance task, usually required every 6 to 12 months.
- How to replace: You must carefully depressurize the ink lines, unscrew the line from the top of the dampener, lift the dampener off the printhead post, and install the new one. Ensure the O-rings are seated properly to prevent air leaks.
- Tip: Always replace your white ink dampeners more frequently than your CMYK dampeners, as the white ink degrades the filters much faster.
7. The Unsung Hero: Pretreatment Machine Maintenance
You cannot have good DTG prints without good pretreatment. The pretreatment solution is a sticky, salt-based chemical that acts as a primer on the garment, allowing the white ink to flash and bind to the surface rather than soaking into the cotton fibers.
Because pretreatment is essentially a liquid glue, dtg pretreatment machine upkeep is crucial. If your pretreat machine is failing, your prints will look terrible, even if your printer is in perfect condition.
Daily and Weekly Pretreat Upkeep
- Flush the Lines Daily: Never leave pretreatment solution sitting in the machine’s lines overnight. At the end of every day, swap your pretreat jug for a jug of distilled water. Run the spray cycle several times until only pure water is spraying out.
- Clean the Spray Nozzles: Remove the brass or plastic spray nozzles at the end of the day. Soak them in warm distilled water or a dedicated pretreat cleaning solution overnight. This prevents the salts from crystallizing and blocking the spray pattern.
- Wipe Down the Rails: The sticky overspray will coat the drive rails of the pretreat machine. Wipe the rails down weekly and apply a light coat of white lithium grease to keep the carriage moving smoothly.
- Filter Maintenance: Check the inline filters inside the pretreat jugs. If they look crusty or dark, replace them so the pump doesn’t have to work as hard to pull the fluid.
8. Troubleshooting: Reading Your Prints
Even with perfect DTG printer maintenance and care, things occasionally go wrong. Learning to read your prints and identify the root cause of a defect is an essential skill for any print shop operator.
Why is My DTG Printer Banding?
Banding is the most common print defect in DTG. It appears as horizontal stripes of lighter or missing ink across the image. Customers will not accept banded prints, so you must fix it immediately. But why is my dtg printer banding? There are several primary culprits:
- Clogged Nozzles: The most obvious cause. If nozzles are blocked, there will be gaps in the ink laydown. Fix: Run a cleaning cycle and check the nozzle pattern.
- Air in the Lines or Dampeners: If an air bubble gets trapped in the dampener, it blocks the flow of ink. Fix: Perform a line fill or heavy clean to suck the air bubble out through the waste tube.
- Dirty Encoder Strip: If the printer doesn’t know exactly where the carriage is, it may overlap passes or leave gaps, creating a banding effect. Fix: Clean the encoder strip.
- Incorrect Head Height (Platen Gap): If the platen (the board the shirt sits on) is too low, the ink droplets have to travel too far through the air, causing them to scatter and create fuzzy banding. Fix: Raise the platen so the garment is closer to the printhead (but not so close that it rubs).
- Failing Wiper Blade: If the wiper blade is old and warped, it won’t clean the printhead properly, leaving a film of ink that misdirects the nozzles. Fix: Replace the wiper blade.
Faded or Washed-Out Prints
If your colors look dull or the white ink is not bright, the printer might not be at fault. This is usually a pretreatment issue.
- Too little pretreat: The white ink soaks into the shirt, looking gray and dull.
- Incorrect curing: If you don’t cure the pretreat properly with a heat press before printing, the ink will mix with the wet chemical and look terrible. Ensure your heat press temperature is accurate using a laser thermometer.
9. Vacations and Downtime: Long-Term Storage
One of the biggest mistakes new custom apparel business owners make is turning off their DTG printer and going on vacation for a week. Water-based inks dry incredibly fast, and sitting idle is a death sentence for a printhead.
If you are not going to use your machine for more than 3 or 4 days, you must follow proper direct to garment printer storage procedures.
The Flushing Procedure (For Extended Storage)
If you are closing shop for a week or more, the safest route is to remove the ink from the machine entirely.
- Remove the Ink Cartridges: Take out the CMYK and White ink cartridges or tanks.
- Insert Cleaning Fluid Cartridges: Replace them with dedicated flushing/cleaning cartridges.
- Run a System Flush: Use the printer’s utility menu to run an initial system fill or “ink charge.” This will use the internal pumps to suck the thick ink out of the lines and pull the clear cleaning fluid in.
- Verify Clear Lines: Look at the transparent ink lines above the printhead. They should look completely clear, with no traces of pigment.
- Wet Cap the Head: Put a generous amount of cleaning fluid into the capping station to ensure the head remains moist.
- Power Down Safely: Once the system is full of cleaning fluid, it is safe to turn the machine completely off. The cleaning fluid will not dry out or clog the printhead, even if left for a month.
When you return, simply reverse the process: swap the cleaning cartridges for ink, run an ink charge to pull the ink back into the lines, and run a few test prints until the colors are rich and vibrant.
10. Advanced Business Tips for Print on Demand Shops
Mastering DTG printer maintenance and care isn’t just about turning wrenches; it’s about integrating maintenance seamlessly into your business operations so it doesn’t eat into your profitability.
Tracking Maintenance Logs
Do not rely on memory. Hang a clipboard next to every printer in your shop. Require operators to initial the log every morning when they do the nozzle check and every evening when they clean the wiper blade. When a machine breaks down, the first thing a support technician will ask for is your maintenance log.
Inventory Management for Consumables
Maintenance stops happening when you run out of supplies. You should always have a “go-bag” of spare parts on hand. If a wiper blade snaps on a Tuesday afternoon in the middle of a massive order, waiting three days for shipping is unacceptable. Always keep in stock:
- Lint-free foam swabs (hundreds of them).
- A gallon of manufacturer-approved cleaning fluid.
- Spare wiper blades.
- Spare capping station sponges/assemblies.
- At least one full set of CMYK and White ink dampeners.
- Extra inline filters for your pretreatment machine.
Train Your Staff on the “Why”
If you hire employees to run your custom apparel shop, take the time to explain why they are cleaning the capping station, not just how. When an operator understands that failing to shake the white ink causes titanium dioxide sedimentation that will destroy a $2,000 printhead, they are much less likely to cut corners. Treat your operators as technicians, and they will treat your equipment with respect.
Conclusion
Owning a DTG printer is one of the most exciting and profitable avenues in the print on demand and custom apparel world. The ability to print a photorealistic design onto a hoodie in less than two minutes is akin to modern magic. But that magic requires a foundation of strict discipline and care.
From maintaining optimal humidity for dtg printing to rigorously following your daily vs weekly dtg maintenance schedule, every small action you take contributes to prolonging dtg printhead lifespan and ensuring the highest quality output for your customers. Never underestimate the importance of white ink circulation system cleaning, always respect proper direct to garment printer storage procedures during downtime, and keep a watchful eye on your dtg pretreatment machine upkeep.
If you treat your machine like a high-performance sports car—giving it premium fuel, daily checks, and regular tune-ups—it will reward you with years of reliable, stunning prints and a thriving business. Stop viewing maintenance as a chore, and start viewing it as the primary protector of your profitability. Happy printing!